 in
in Daylight contains a lot of blue light, which affects how our body operates. Do you know why you have an issue waking up in the morning during winter? Because there is not enough (blue) light that would trigger the booting procedure of your body. To overcome this issue, you can find really powerful lights as an alarm clock to make your winter morning like the summer sunshine.
However, the bigger problem is on the other side of the day, during the evenings. Traditionally, we were surrounded by less and less blue light as night was approaching, which triggered a process of setting our body to sleep mode. These days, our screens (no matter whether it's a phone, notebook, or TV) produce a lot of artificial blue light.
Of course, our body is not used to that. That's the reason why we end up in the bed watching the ceiling for hours. After some time, we give it up and take our phone and mess our circadian code even more. Now you understand if you wondered why night mode is such a prominent feature of any operating system or device.
But that is not enough. We should also adjust other lights in our homes, not only screens. It is good to use powerful light when you don't plan to sleep yet, but switching to dim lights at least one hour before sleeping is more than welcome.
The question is: what about light in the bathroom, for example?
My wife suggested we could buy some soft light to cover the situation when we need to visit the bathroom when we are already in sleep mode. (Our only light there is super strong, and it is always painful contrast to the rest of our apartment.) I looked at her and asked why we would buy it when I could build it!
I'm very sorry that it took me so long! But I can say, after a year, we finally have it!
It took me so much time because I wanted a wireless battery version: a small box under the ceiling providing dim light when we don't use the main light, and movement is detected—three simple components connected to Arduino with a simple code. Pretty easy build indeed!
Except, Arduino can deplete batteries in a few days. It doesn't matter if Nano or Micro is used; the difference can be just a few hours. I managed to create the first prototype in one hour, but it lasted only till the second day. I needed something better.
Here comes the second reason why it took so long. I wanted to play with Arduino, but the only chance to solve the battery issue most efficiently was not using Arduino! I took a break for several months from it.
Sure, Arduino is quite useless anyway in this case. Motion detector provides a logical one if a movement is detected, and light sensor provides an analog value of the light intensity, which can be converted into a digital value using a resistor (kind of, but good enough for this use case). Now it's just about using gates and connect it all together.
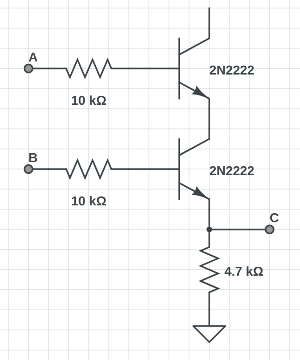
At least if you have gates around. I didn't, but I had transistors. It was an enjoyable exercise to create my logical gate! Much more rewarding feeling than any code can do, to be honest. I hacked together the prototype and it kind of worked. It was okay, but not super precise, voltage fluctuated, and the consumption was still unacceptably high.
Example of an AND gate using transistors:
With pre-made gates, I could construct a much more stable prototype. First, I started with a straightforward version. When you can use any logical gate, it is an elementary task. You just put AND here, OR there, and NOT in between. The problem is, an integrated circuit comes with few logical gates of the same kind on it, and every chip is draining your battery!
As few paragraphs above was good to know how transistors work, now it is good to know boolean algebra. I studied all this, but I was interested only in the code back then; now, I appreciate that I still remember some stuff. Any logical circuit can be represented in many various ways. You just need to transform the function to a different form producing the same output for each input.
I had this logical table I had to obey (in other words, use the light when there is movement without a light):
| Movement | Light | Output |
|---|---|---|
| 0 | 0 | 0 |
| 0 | 1 | 0 |
| 1 | 0 | 1 |
| 1 | 1 | 0 |
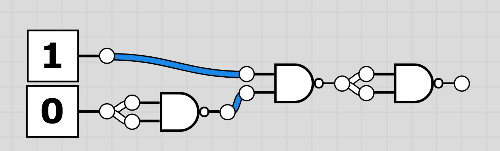
That can be represented as M AND NOT L, or as ((L NAND L) NAND M) NAND ((L NAND L) NAND M). It might look complicated, but actually, it is just three NAND gates. We can simplify the representation by extracting (L NAND L) NAND M into variable A, which gives us A NAND A. That can be put together with a chip from 7400 series containing four NAND gates like this (where one represents movement detector and zero light detector):
I was so so happy! My calculation revealed it should be running for months, at least if used a few to several times every evening. But.
But I didn't consider that my wife gets used to it and will use it every time during the day! In two weeks, it was out again. It was again collecting dust on my table waiting for me to find ways around it until the project was changed into a completely different build: a restroom clock. With Arduino and exciting challenges! Stay tuned.
