 in
in In the previous post about page turner project, I talked about the course, which forced me to allocate my time and really build something. Electrical builds, including Arduino or Raspberry, are relatively easy for me. It is just about connecting pieces together and writing code for it. For sure, it is not as easy as developing (web) applications—UX and technical options are pretty limited—yet still not that challenging as creating a fully mechanical project.
One of the projects as part of the course was precisely that—mechanical build. I had no idea what I could do or even what I could manage to do (I had to use what I had at home because hobby shops were not open during strict lockdown when the course was ongoing). I found some springs around, so I thought I could build a more simplistic kitchen timer because I was amazed by automatic watches.
I failed miserably. Which is fine because we had a mechanical kitchen timer anyway. I was curious how much miserably I failed and opened it. It is a remarkably great device! Learning the process of how all springs are connected was tremendous fun for me. And there is an endless list of videos on the internet!
You read it well: the result is no build and no kitchen timer anymore. I was not able to put it back together. It’s a too fine device for my skills (and tools).
But! No one can stop me from making an even cooler kitchen timer presenting Arduino, right? At least that I can do.
I used several parts for this project:
- 7-segment display to set and show timer.
- Potentiometer to set time.
- Button to start and stop the timer.
- Buzzer to play some lovely melody.
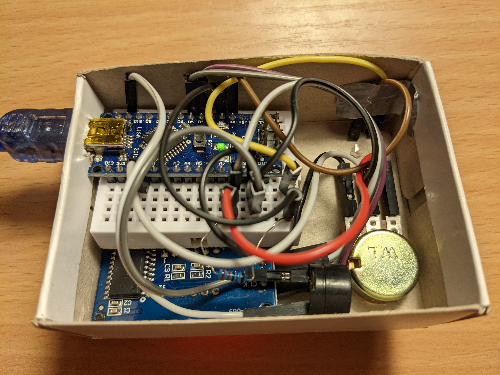
You can check out the rough schema in the following picture. Note it might be a bit different in your case as it depends on what exactly you have around. For example, my display is connected over I2C instead of over serial. The schema also connects buzzer using transistor for cases when buzzer operates on different voltages than Arduino, something I didn’t have to do.

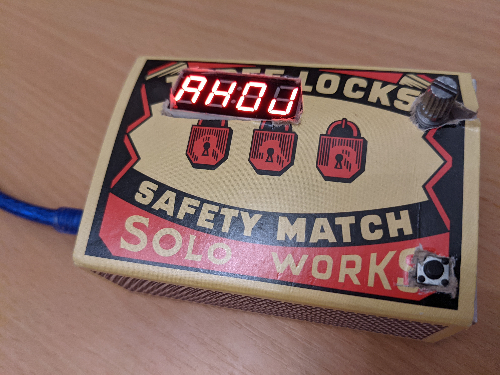
This schema can look like this when converted to the physical world. I used a simple matchbox as a case for this project. It is not perfect, but unique for sure.
When the timer is plugged in, the first message is AHOJ. It perfectly fits the 7-segment 4-digit display and says hello in Czech (and other languages).
The tricky part for me was to come up with an appropriate setting. My first version used a 1kΩ potentiometer, and the analog value mapped to the time range. The range was from zero to ten minutes with a jump of five seconds. That was too granular resolution range for too clumsy potentiometer range. The analog value was not so accurate and stable with just 1kΩ. Ten kilo-ohms were better but still not as good as the final solution with one hundred.
At least stability was good. Accuracy, not so much. The issue was still that my Arduino provides a range of zero to 1023. To cover every fifth second in ten minutes, I need over 100 steps. The UX is not so great then. A slight change on the potentiometer can be a pretty massive change of the value.
After testing, I found that good behavior is with 20 steps only. Now, the task was to find a way to fit a broad range into twenty steps only. First, seconds are not necessary. How often do you need second precision? Never. So I went directly to minutes. Suddenly, I could cover now twenty minutes.
But twenty minutes is not enough sometimes. Sometimes, I need a reminder in one hour. Our mechanical kitchen timer could do that. Mapping twenty steps to sixty minutes mean having a precision of three minutes. Not great for short times. Do you want your egg to be boiled precisely for eight minutes? Too bad…
Therefore, I came up with a solution: precision of one minute for the first ten minutes, and anything beyond jumps by five minutes up to one hour—a reasonable compromise of wide range and fine-tuning the short reminders.
Here is the essential part of the code:
    int value = analogRead(A0);
    value = map(value, 0, 980, 1, 20);
    value = min(value, 10) + max(0, value-10)*5;
    value *= 60;
In the end, the setting was easy to tweak. It just needs some time to test a few options, see how it works, and find the best usage. I was more afraid of the melody. I wanted something nice, but my musical skill is not good, and I cannot simply play an mp3 file on Arduino. Moreover, with a simple buzzer!
The good news is, you don’t have to do everything alone. Arduino is quite popular, and almost everything you are trying to build, someone already made before you. You just need to use Google.
A small side note: If you feel this is cheating, well, it’s not. At least it depends on why you are even playing with Arduino. I have fun building stuff, but not when it takes ages, and I need to first learn tons of things before making a small hello world. In the end, using Arduino could also be cheating. For example, my previous build would be possible to do without it for sure.
So after a bit of googling, I found an excellent repository with charming melodies! I liked Pink Panther the most for this build. Simple copy&paste and here is the final product:
Here is the complete code except for the melody itself. Just copy the one you like from the mentioned repository and rename setup to bzzz. ;)
#include <TM1637Display.h>

#define CLK 4
#define DIO 5

long lastPress = 0;
long timer = 0;
bool timerRunning = false;

const uint8_t SEG_AHOJ[] = {
    SEG_A | SEG_B | SEG_C | SEG_E | SEG_F | SEG_G,   // A
    SEG_B | SEG_C | SEG_E | SEG_F | SEG_G,           // H
    SEG_A | SEG_B | SEG_C | SEG_D | SEG_E | SEG_F,   // O
    SEG_B | SEG_C | SEG_D | SEG_E                    // J
};
const uint8_t SEG_DONE[] = {
    SEG_B | SEG_C | SEG_D | SEG_E | SEG_G,           // d
    SEG_A | SEG_B | SEG_C | SEG_D | SEG_E | SEG_F,   // O
    SEG_C | SEG_E | SEG_G,                           // n
    SEG_A | SEG_D | SEG_E | SEG_F | SEG_G            // E
};

TM1637Display display(CLK, DIO);

void setup() {
    Serial.begin(9600);

    pinMode(A0, INPUT);
    pinMode(11, OUTPUT);

    display.setBrightness(10); // Range: 0-15
    display.setSegments(SEG_AHOJ);

    attachInterrupt(digitalPinToInterrupt(2), buttonPressed, FALLING);
}

void loop() {
    if (!timerRunning) {
        loopSetTimer();
    } else {
        loopTimerRunning();
    }
}

void loopSetTimer() {
    int value = analogRead(A0);
    if (value == 0) {
        return;
    }

    value = map(value, 0, 980, 1, 20);
    value = min(value, 10) + max(0, value-10)*5;
    value *= 60;

    if (timer == 0) {
        timer = value;
    }
    if (timer != value) {
        timer = value;
        printTime(false);
    }
    delay(50);
}

void loopTimerRunning() {
    if (timer > 0) {
        timer -= 1;
        printTime(true);
    } else {
        display.setSegments(SEG_DONE);
        bzzz();
        delay(100);
    }
}

void printTime(bool showDots) {
    uint8_t segment[] = { 0, 0, 0, 0 };
    if ((timer/60)/10 != 0) {
        segment[0] = display.encodeDigit((timer/60)/10);
    }
    segment[1] = display.encodeDigit((timer/60)%10);
    if (dots) {
        segment[2] = display.encodeDigit((timer%60)/10);
        segment[3] = display.encodeDigit((timer%60)%10);
    }
    display.setSegments(segment);

    if (!showDots) {
        return;
    }

    colonDelay();

    // To show colon (:).
    segment[1] = segment[1] + 128;
    display.setSegments(segment);

    colonDelay();
}

void colonDelay() {
    for (int i = 0; i < 10; i++) {
        if (!timerRunning) {
            return;
        }
        delay(49);
    }
}

void buttonPressed() {
    if (lastPress + 500 > millis()) {
        return;
    }

    lastPress = millis();
    timerRunning = !timerRunning;
}
