in
in Last time, we put together a very simple weather station. Not very useful as data were logged only to console, and only the current values. Observing trends would not be possible like that. Of course, we could attach a display and fill Arduino memory with the statistics, but that is not very feasible. The memory is relatively small, and every restart would lose the whole history. Therefore, we need to collect data and store it somewhere else. Let's talk about collecting first.
It's a pain.
Really.
The new era of an interconnected home where every bulb can talk to every LED is scary. Just making simple wireless communication is hard, not yet mentioning secure or even private. I don't want to know how bad all the products available on the market are—sweat reliable cables.
I might be biased because I think I tried the worst possible option: Arduino with externally connected ESP8266 ESP-01 module. Arduino is cheap, and ESP-01 is super cheap. The marketing said “the cheapest IoT”! So I bought a few of those modules. I would change the marketing to “the most unreliable and complex IoT”! I don't use ESP-01 in a single build.
Raspberry Pi
After finding out how frustrating it can be to make a simple request with Arduino and ESP-01, I decided to grab simply Raspberry Pi. It's a whole computer, and I can do anything with my favorite Python. That may be true, but Raspberry will consume more power, is more expensive, and is just an overkill. On top of that, there is no analog pin, which I need for air quality sensor.
Anyway, I had it available and wanted to finally gather some data and send it to my server, so I connected it all together: that is, sensors to Arduino (which I already had in place) and Arduino board to Raspberry Pi. Then you can simply read a serial line and do whatever is needed. I logged all measurements to serial as shown in the previous post, and then I used the following Python code to read and send it to my server:
import serial

ser = serial.Serial('/dev/ttyUSB0', 9600)

while True:
    line = ser.readline()
    processLine(str(line, 'utf8'))
It's very oversimplified code. Mine is adding a lot of extra exception handling. But it is enough to illustrate what else can be achieved. It might be helpful one day for something serious.
Note that you need to install python3-serial package and the Python library pyserial. Also, you might find your Arduino in a different place; just check it out by listing all ttys: ls /dev/tty*
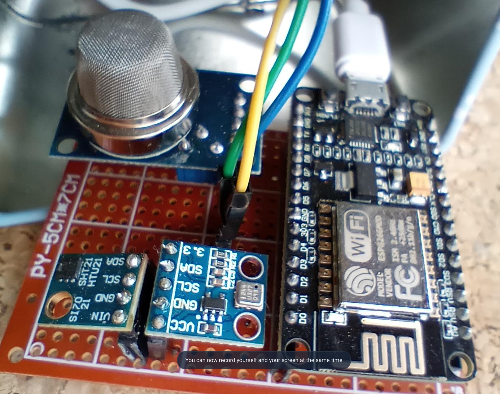
NodeMCU
In the end, I ended up with NodeMCU boards that have Wi-Fi integrated, and this nice ESP8266WiFi library can be used. It is not the only available alternative, though. Any alternative where you can load mentioned library is 99% of success. Then the connection to the server and the data sending is as easy as:
#define WIFI_SSID ""
#define WIFI_PASS ""
#define METEO_HOST ""
#define METEO_PORT 80
#define METEO_LOCATION "test"

void connect() {
    WiFi.mode(WIFI_STA);
    WiFi.begin(WIFI_SSID, WIFI_PASS);
    Serial.print("Connecting");
    while (WiFi.status() != WL_CONNECTED) {
        delay(500);
        Serial.print(".");
    }
    Serial.println();

    Serial.print("Connected, IP address: ");
    Serial.println(WiFi.localIP());
}

void sendData() {
    Serial.print("Connecting to ");
    Serial.println(METEO_HOST);

    WiFiClient client;
    if (!client.connect(METEO_HOST, METEO_PORT)) {
        Serial.println(">>> Failed");
        connect();
        sendData();
        return;
    }

    if (client.connected()) {
        String url = (
            "/?loc="+String(METEO_LOCATION)+
            "&temp="+String(temperature)+
            "&hum="+String(humidity)+
            "&pre="+String(pressure)+
            "&air="+String(airQuality)
        );

        Serial.print(">>> Request to ");
        Serial.println(url);

        client.print(
            String("GET ") + url + " HTTP/1.1\r\n" +
            "Host: " + METEO_HOST + "\r\n" +
            "User-Agent: esp\r\n" +
            "Connection: close\r\n\r\n"
        );
    }

    unsigned long timeout = millis();
    while (client.available() == 0) {
        if (millis() - timeout > 5000) {
            Serial.println(">>> Timeouted");
            client.stop();
            connect();
            return;
        }
    }

    while (client.available()) {
        char ch = static_cast<char>(client.read());
        Serial.print(ch);
    }

    Serial.println();
    Serial.println(">>> OK");
    client.stop();
}
You might notice that there is HTTP, not HTTPS. The usage is way better than low-level AP commands, but we are still working with a microcontroller, not a microcomputer. I decided not to care about everything and use plain HTTP as all the communication is done on my network anyway, but I would reconsider if this should be available outside of home network as well.
Also, I recommend moving as much work as possible to the server part to keep the logic on the Arduino board as simple as possible. The client part is more limited and harder to debug.
Good! We are sending data somewhere to the cloud (a fancy name for a server), which is not there yet. Let's look into this crucial detail in the next post.